
Sencha Animator Chapter 2: Guided Tour
To make effective use of Sencha Animator, it’s important to learn the major parts of the interface and feature groupings. This guided tour of Animator provides a brief introduction to Animator functionality and suggests exercises to help you learn your way around the tool.
Download and launch Animator
- Download the free trial version of Animator and install it. Animator supports Windows, OS X, Linux 32-bit, and Linux 64-bit. You should have a fast processor and at least 1.5 GB RAM and 100 MB of storage memory to make best use of Animator.
- Launch Animator to open the main application window, shown just below, and follow along with the tour by following the directions after each Exercise title.
Animator Interface:
- Menu bar
- Timeline and Object Tree
- Tools panel
- Clock
- Record button
- Stage
- Scenes panel
- Keyframe/Base State toggle
- Properties panel
- Library panel
- Project panel
Menu bar
Use the Animator menu bar to open, save, preview, and export projects. It also contains high-level control over project elements, including duplicating scenes; duplicating, removing, and positioning objects within a project; deleting keyframes and setting keyframe time.
Timeline and Object Tree
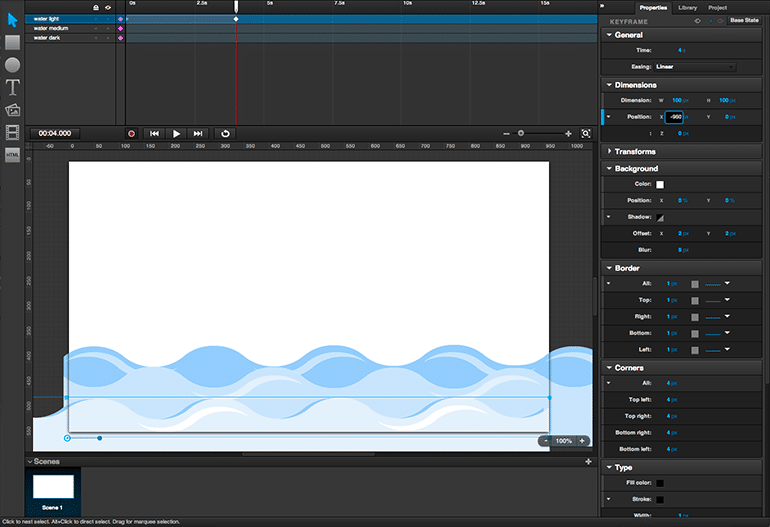
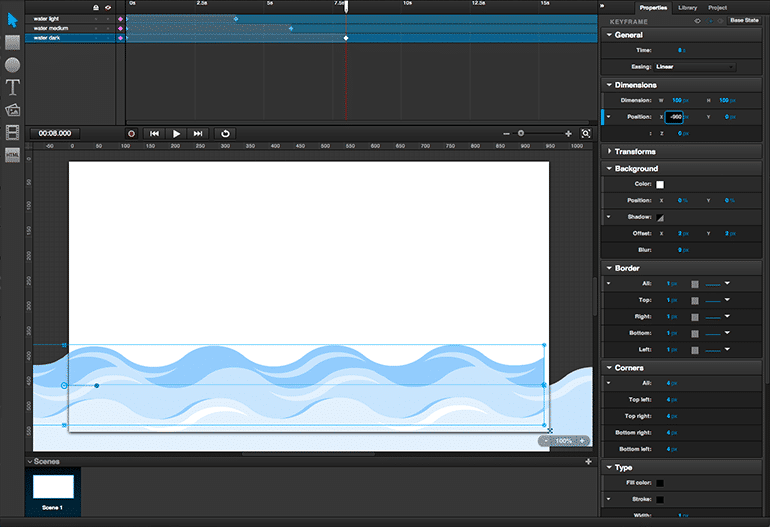
Use the Timeline to set keyframes within scenes — the points in an animation where transformations begin and end. Set a keyframe by selecting the object in the Timeline and double-clicking under the time you want to use for the keyframe.
When a keyframe is set, its effects and attributes, including the precise time for the keyframe, can be defined under Keyframe in the Properties panel. You can return to the keyframe any time to change its properties, and set as many keyframes for an object as you need to create an effective animation.
Use the Object Tree to move an object toward the front or back of a scene and for nesting objects. To move an object to the front or back of a scene, drag it higher in the Object Tree to move it to the front, lower to move it to the back, dropping it on a line in the Object Tree, not on top of another object. To nest objects, drop an object on top of another object; the second object becomes a child of the first parent object and inherits the parent’s properties.
Tools panel
Select from different types of objects to add to a project using the tool panel or select the pointer to edit elements already in the project. Choose from squares, circles, text, images, and video, then single click an icon to select the kind you want to add. Clicking the Stage adds the object to the project. Clicking and dragging lets you add and size the object. Objects appear in the Stage and are listed in the Object Tree. After adding an object, the Tools panel reverts to the pointer, so you can click an object and edit it.
Note that after adding image and video object types to a project, the specific image or video has to be imported from an external source.
Clock
Use clock to step through animations or to set precise time for keyframes.
Record button
Turns Recording mode off and on. Default position is on. With Recording mode on, move objects in Stage to create new keyframes and determine positions for animations.
Stage
Control the position, size, color, and other attributes of an object on the Stage. When you position the cursor over Stage, text is displayed at the bottom of the Animator window describing available controls. Select objects to edit their attributes, dragging to reposition and resize them. When an object is selected, its properties can be edited under Object in the Properties panel.
Zoom the Stage by clicking the “-” and “+” signs in the lower right corner of the Stage. Move to a different part of the Stage using the scroll bars at the bottom and left sides of the Stage. Recenter Stage by clicking 100% in between the “-” and “+” signs.
Objects can also be duplicated using the Stage using familiar copy-paste commands. Additionally, horizontal and vertical guidelines can be added to the Stage by dragging from the left and top borders. Eliminate guidelines by dragging them off the Stage.
Scenes panel
Add, duplicate, delete, and reorder scenes and navigate between them using the Scenes Ppanel. New scenes are added by clicking the “+” sign in the upper right corner of the Scenes panel. Scenes are duplicated using commands from the Menu Bar. Delete scenes using the delete key on the keyboard. Reorder scenes by dragging them forward or backward in the panel. Navigate to a scene by clicking the scene in the Scene panel. The contents of the scene will appear in the Stage so you can edit it.
Keyframe/Base State toggle
Located at top of Properties panel. Click to view Base Object or Keyframe properties in Properties panel. Note that when Base Object properties are visible toggle lets you switch to Keyframe State, and when Keyframe properties are visible toggle lets you switch to Base Object.
Properties panel
Where the vast majority of Animator controls reside, the Properties panel contains three main parts. The Scene controls are used to set properties that apply to an entire scene. The Scene controls become visible when a scene is selected. Object controls sets base properties for an object that persist throughout the animation; select an object to view the Object controls. Keyframe controls are used to set the properties that transform an object during the animation; they become visible when a keyframe is selected.
Setting attributes in the Properties panel determines the appearance and behavior of the initial state of an object and any transformations it goes through during the animation. Detailed information about using the Properties panel appears in the Animator Reference, starting with Properties Panel Overview; they are too extensive to introduce here.
Library panel
Use the Library panel to manager project assets and the library of reusable objects. The Pasteboard objects can be saved and shared between the projects. Images and videos imported to Animator can be saved to the Pasteboard along with any properties you give them.
Project panel
In the Project panel you can set export properties for the project.
Sencha Animator Chapter 3: Step-by-step guide to create rocking boat animation>>