Continuous Integration is a software development practice where continuous changes and updates in code base are integrated and verified by an automated build scripts using various tools.
Continuous Deployment is also a software development practice whose role is to automatically deploy the code to the specified server and application folder once the code is been integrated successfully.
We will use couple of famous tools to CI and CD my app to any particular environment.
Scenario :
Suppose we have setup 3 different environments (Development, Staging and Production) and all the server are architectured on Amazon Web Services.
As a part of architecture , Our application was deployed on 3 tier architecture (Client Tier, Business Logic Tier and Database Tier) and it was featured with AWS Auto Scaling service which used to help scale our servers depending on the metrics and policies we specified.
So, every time a new feature was developed, we had to manually run the test cases before the code was integrated and deployed later pull the latest code to all the environments.
Challenges:
1) Manually work to run test cases and pull the latest code on all the servers.
2) Since the servers were auto scaled we had to pull the latest code on one server , take image of that server, re configure it with Auto Scaling.
3) Roll back to last successful pull was a painful task.
Though the above challenges are not the blockers but we have to bring up a technique that must save high amount of time and make our life easy with automating all the process from CI to CD.
We choose to use Jenkins as CI tool and AWS Code Deploy as a CD tool
Lets walk through the flow before we implement it all.
When a new code is pushed to a particular GIT repo branch.
1) Jenkins will run the test cases, (Jenkins listening to a particular branch through git web hooks )
2) If the test cases fail. It will notify us and stop the further after build actions.
3) If the test cases are successful , it will go to post build action and trigger aws code deploy.
4) Jenkins will push the latest code in the zip file format to AWS S3 on the account we specify.
5) AWS Code Deploy will pull the zip file in all the Auto Scaled servers that have been mentioned.
6) Once the latest code is copied to the application folder , it will once again run the test cases.
7) If the test cases fail it will roll back the deployment to previous successful revision.
8) If it is successful , it will run post deployment build commands on server and ensure that latest deployment does not fail.
Now lets follow above steps and configure everything from scratch.
Assumptions:
1) You have a Git Hub account with admin access and a sample repo.
2) This article is written for Ubuntu 12.04 but the instructions are universal
3) You have AWS User Credentials , Secret Key and Access Key with Power user rights
4) Ive configured Jenkins on my local machine and i have my application server on AWS where the application updates are going to be deployed automatically.
A. CONFIGURE AWS CodeDeploy Application:
I assume you have all the access required to configure AWS CD
1) We need to configure 2 IAM Roles that would be used to boot your ec2 server / access S3 and then for Code Deploy to talk to ec2 server.
We will name them CodeDeploy and EC2CodeDeploy
To create the role go to IAM Service select Roles -> Create New Role
Enter the name CodeDeploy and select Next
Select Amazon EC2 as Role Type and select Next
Under Set Permissions choose Custom Policy and select
Enter the name CodeDeploy and paste the below policy
CodeDeploy Policy
{ “Version”: “2012-10-17”, “Statement”: [ { “Action”: [ “autoscaling:PutLifecycleHook”, “autoscaling:DeleteLifecycleHook”, “autoscaling:RecordLifecycleActionHeartbeat”, “autoscaling:CompleteLifecycleAction”, “autoscaling:DescribeAutoscalingGroups”, “autoscaling:PutInstanceInStandby”, “autoscaling:PutInstanceInService”, “ec2:Describe*” ], “Effect”: “Allow”, “Resource”: “*” } ] }
Select Next and Create Role. This show the list of roles created.
Now we need to select CodeDeploy and select Edit Trust Relationship
Replace the policy with below policy
Policy Trust for CodeDeploy
{ “Version”: “2012-10-17”, “Statement”: [ { “Sid”: “”, “Effect”: “Allow”, “Principal”: { “Service”: [ “codedeploy.us-west-2.amazonaws.com“, “codedeploy.us-east-1.amazonaws.com” ] }, “Action”: “sts:AssumeRole” } ] }
and Update Trust Policy
2) Now you need to follow the above steps to create EC2CodeDeploy policy
Paste the below Policy
{ “Version”: “2012-10-17”, “Statement”: [ { “Action”: [ “s3:Get*”, “s3:List*” ], “Effect”: “Allow”, “Resource”: “*” } ] }
No need to edit the Trust Policy.
3) Now you need to launch Amazon Linux (contains aws cli pre installed) or any other instance, in my case Ubuntu attached with IAM role EC2CodeDeploy and install aws cli with aws code deploy agent.
To Install CodeDeploy agent follow below steps
Considering you have installed aws cli
aws configure : Fill in Secret Key, Access Key and Region (CodeDeploy only supports N.Virginia and Oregon region)
aws s3 cp s3://aws-codedeploy-us-east-1/latest/install . –region us-east-1 chmod +x ./install sed -i “s/sleep(.*)/sleep(10)/” install ./install auto service codedeploy-agent status
Remember that you need to place the appspec.yml file in your application repo.
here is one sample appspec.yml file
version: 0.0 os: linux hooks: BeforeInstall: – location: scripts/beforecicd.sh runas: root AfterInstall: – location: scripts/aftercicd.sh runas: root
The beforecicd.sh script files contains all the commands that needs to be done before the code is deployed to the application folr.
In my case I create a folder that will just take a backup of some files.
aftercicd.sh file contains commands that will run some test cases to check if the application is deployed properly.
4) Now we will create AWS CodeDeploy Application
Go to AWS CodeDeploy -> Get Started -> Custom Deployment
This will bring you to Create New Application page.
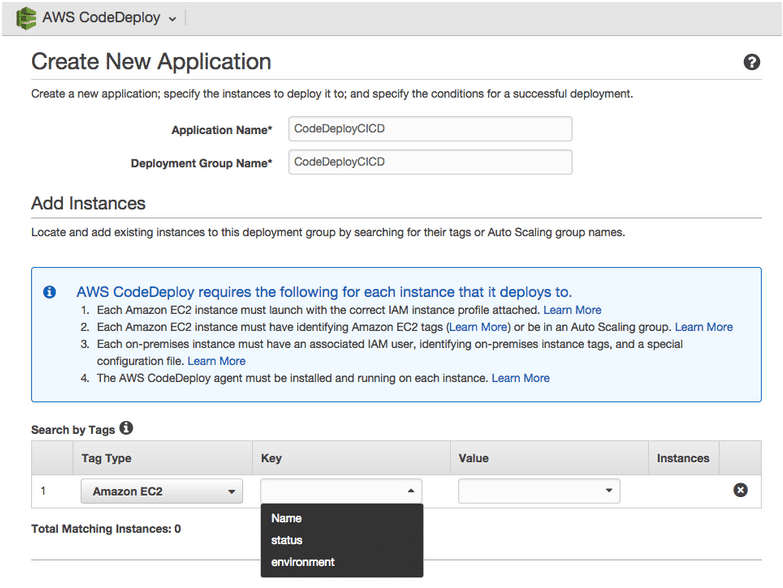
Fill in the Application Name and Deployment Group Name
The next interesting part is selecting the instances where you want to deploy the application.
In Add Instances part you can search and select your Instances or AutoScaling Group by tag names.
Here we select the instance that we had launched.
Next
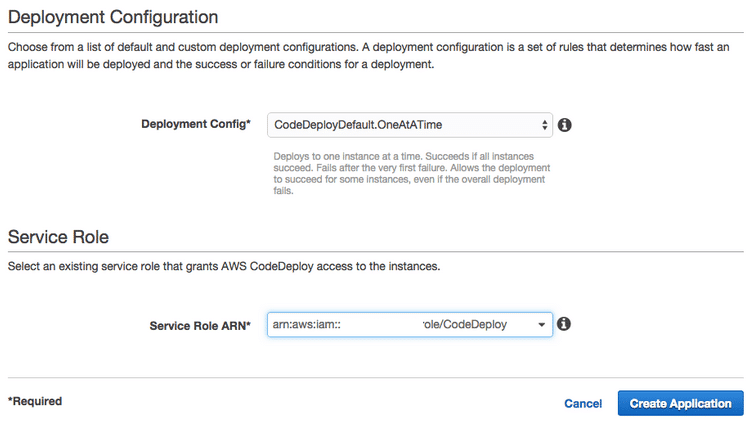
Deployment Config , here we can set it to One at a Time since we have only one server for now.
Service Role , here we attach the tole CodeDeploy Role that we had created.
Finally select Create Application.
Here we finish with configuring AWS CodeDeploy
Now next part would be to install and configure Jenkins.
Related Reading
[wcp-carousel id=”10026″]
B. INSTALL JENKINS
1) We have to add the key and source list to apt.
wget -q -O – http://pkg.jenkins-ci.org/debian/jenkins-ci.org.key | apt-key add – echo deb http://pkg.jenkins-ci.org/debian binary/ > /etc/apt/sources.list.d/jenkins.list
2) update apt’s cache
apt-get update
3) The cache has been updated. Now we can proceed with installing Jenkins
apt-get install jenkins
CONFIGURE JENKINS
Once the installation is done you can open Jenkins UI with YOURPUBLICIP:8080
If the jenkins page does not open you can login into the server where you have installed jenkins and check the Jenkins log
tail -f /var/log/jenkins/jenkins.log
Also check
sudo service jenkins status
1) Now open the page YOURPUBLICIP:8080
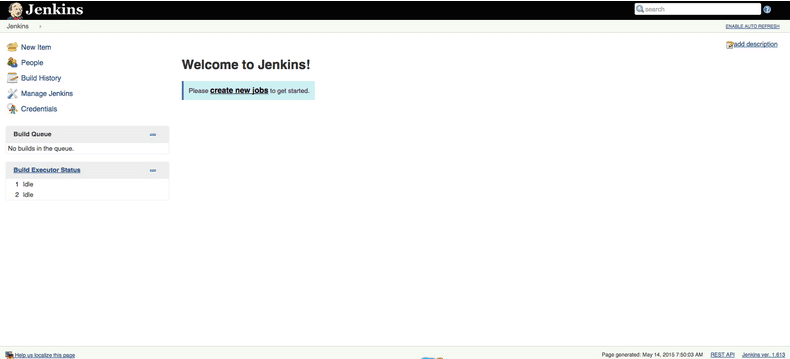
Well, the Jenkins is not secure now. To secure you can go to
Manage Jenkins -> Configure Global Security -> tick Enable Security Under Security Realm -> tick Jenkin’s own user database & Under Authorization -> tick Logged-in users can do anything.
This will take you to the signup page.
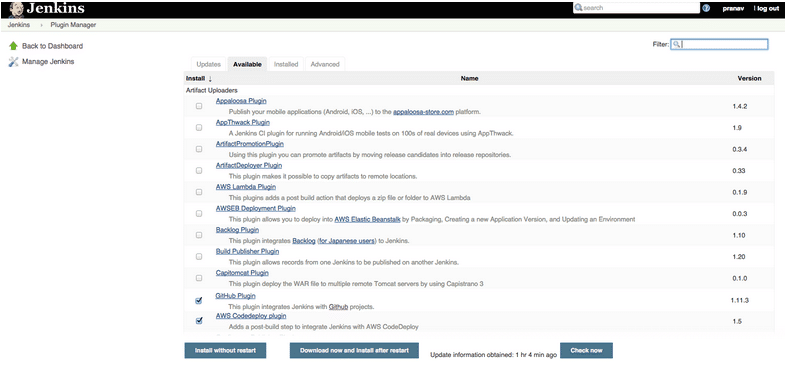
2) Since we are using GIT as version control tool and AWS Code Deploy as Deployment tool, we need to install these plugins in Jenkins Manage Plugins option.
to install the plugin
Go to Jenkins Manage Jenkins -> Manage Plugins
In the Available tab search and select GitHub Plugin and AWS CodeDeploy plugin
After selecting click Download and Install after restart
This will download and install both the plugins and restart Jenkins .
2) Its time to create a project in Jenkins and implement CI / CD
Before we go ahead with the further configuration. FYI, My server which contains Jenkins has all the dependencies installed that are required by my app code to build.
>> Create a freestyle project by clicking New Item option

>> Now lets get our git repo url for our project. You can paste your own repo url and paste it in the GitHub Project box

>> In the advanced tab you can mention any specific directory path where you would like jenkins to build the application.
In this case i have kept it to default.
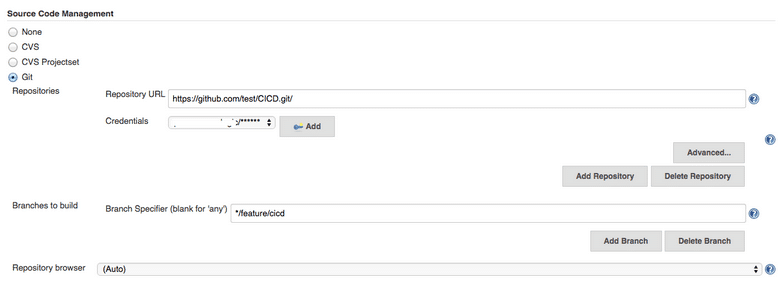
>>Next is you need to fill in the Repository URL with Credentials
Along with the branch in the Branch Specifier
>> In the Build Triggers options you can select Build when a change is pushed to GitHub
What this will do is whenever a new update is pushed to the specified branch in my case */feature/cicd, Jenkins will automatically get triggered, pull the latest updates from the git repo and perform build actions.
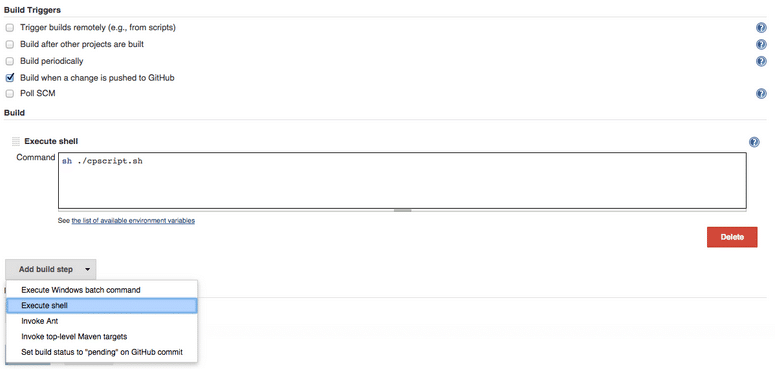
The Build option contains build steps, in my case i have selected Execute Shell.
The Command box contains a shell script saved in my jenkins home directory.
This script contains commands to run test case for the application.
If the test case fail then Jenkins would not go further to deploy or won’t perform any further actions and report as Build Failed.
In other case if the test case run successful then you are done Continuous Integrating.
Jenkins will go to next step that is Continuous Deployment.
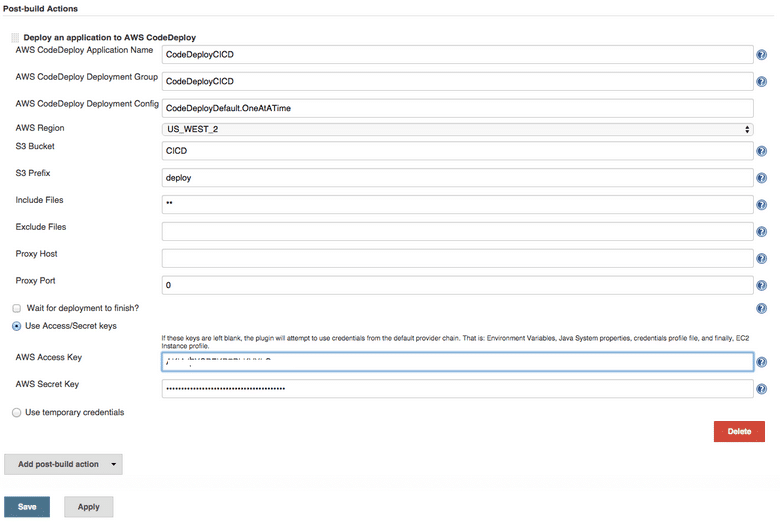
>> Now for CD, under Add Build Step, select Deploy an application to AWS Code Deploy
In AWS CodeDeploy Application Name : Fill in your AWS CodeDeploy application name that you have configured before.
In AWS CodeDeploy Deployment Group : Fill in your AWS CodeDeploy Deployment Group name that you have configured before.
In AWS CodeDeploy Deployment Config : Paste the Deployment Config you have selected in application configuration. In my case CodeDeployDefault.OneAtATime
In the AWS Regions option : Choose your specific region N.Virginia or Oregon
In the S3 Bucket : Enter your S3 bucket name.
In the S3 Prefix : Enter your directory name under the S3 bucket
Keep everything else to default.
Except you need to give your aws credentials
Fill in you Secret Key and Access Key
SETUP GITHUB AND WEBHOOK
3) To finish setting up the integration and deployment
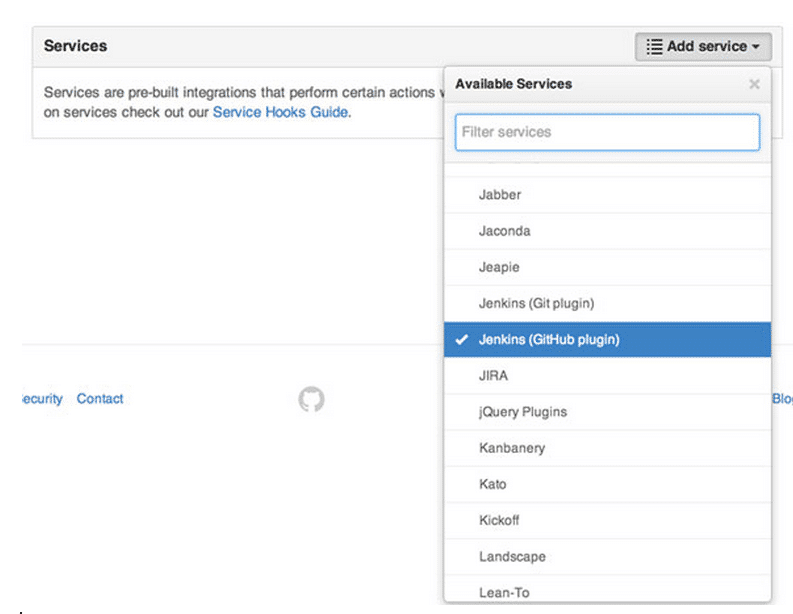
Go to the GitHub repo, and click Settings. Click the Webhooks & Services tab, and then the Add service drop-down. Select the Jenkins (GitHub plugin) service.
Click Add service. Our project is now ready for its first continuous integration test!
Finally Save your project.
4) This will bring you to a dashboard page where it show you all the list of Projects that are created. Further you can select any Project and Manage, Configure , Build etc.
5) Now its time to Build your project.
So, here on my local machine i commit a code update to my git repo and push it to cicd branch.
This will automatically trigger Jenkins and you will see that it has started to build the project automatically.

If the build is successfull Jenkins will create a zip file of your updated application and push it to AWS S3 and further trigger AWS CodeDeploy application.
You will see a zip file created in S3 folder.
<Original Article written by – Pranav Shah, DevOps Engineer, Cuelogic>
Related Reading
[wcp-carousel id=”10006″]
