How to Work with a Multi-Tenant Application Using Single Repository
The first blog of this series concerned our experience in working with multi-tenant applications. It went on to distinguish the use of single repository and multiple repositories. The prime question been, should everything be placed in a single github/svn repository or in separate repositories (tenant wise)? The following blog focuses on working with a multi-tenant application using a single repository.
Multi-tenant application can be created by maintaining single repository with configurations.
Entire application is divided into minute features which can be enabled or disabled via configurations. It seems time consuming at the start or during development. But it makes the application very easy to manage in the longer run.
Once the entire feature is developed, updates are easily done without modifying the majority of the code. Whereas in multiple repository approach of multi-tenant application, updates can be made by making the same change in respective tenant’s repositories.
One of the greatest benefit of single repository approach is to have everything “configuration based”, so that adding a new tenant is a very simple process.
Also, tweaking the configuration for each client helps enable or disable certain features, instead of removing some functionality entirely from code base in multiple-repository approach.
Development phase:
- Need to be very careful about extracting features from application. Divide application in smaller features which can be enabled or disabled without having any impact on the application and other features.
- Caution while coding…execute code only if feature is enabled.
- Testing entire application with all possible values of the features (enabled/disabled).
My experience is, once you have proper setup with configuration, developing new features or adding new functionality for some set of tenants becomes very easy and manageable. Also tenant wise, we can have their own set of features and disable them when not needed, without affecting the other tenants.
Deployment:
Deployment of such applications as different instances for each tenant becomes critical, this is where Docker helps us. Each tenant has a code base on their own server and their own deployments. Docker helps us in sharing only specific tenant’s code from a single repository code base.
Approach we followed for deployment:
We have a single repository, with some architecture level changes to maintain feature-configuration and label file for each tenant. Those files are committed to git repository in their respective config folders (all the other code base remains common to all).
Following diagram depicts the applied sample code architecture for 2 tenants:
The above described architecture helps developers to have an idea about features and labels of each tenant, rather than maintaining them as env files (As .env files are not committed and it becomes difficult to predict values for each tenant and identify the issues they are facing).
This architecture helps to maintain control of the features with us and discloses only required features to the tenant.
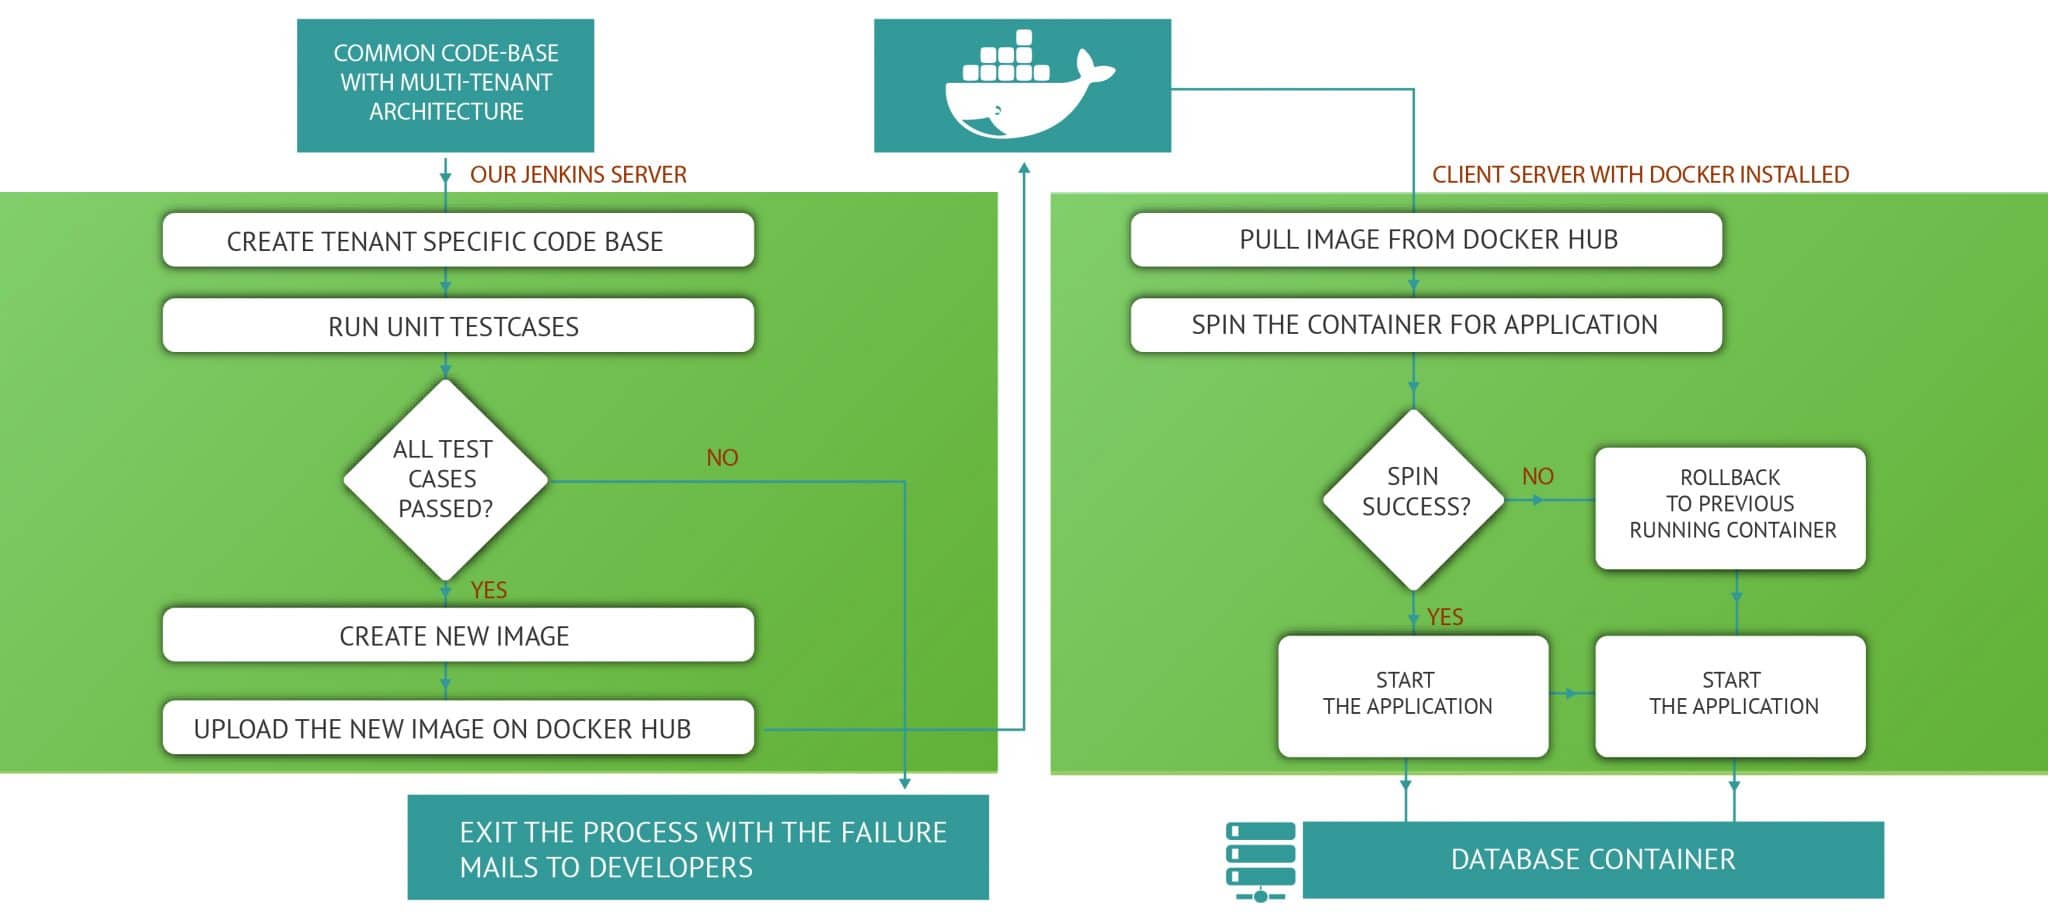
Following diagram demonstrates the approach we followed:
Pre-deployment processing on our Jenkins server:
- To run separate instances for each client, the first step was to separate out the code base with their own configuration.
- Running a script which could identify whether it has to replace the configuration file with tenant specific file or keep the default one. If tenant specific files are not found, default files would be taken and application will still run perfectly with the basic default configuration (With this, adding new tenant with default configuration became just a matter of a click).
- Once the code base is ready, all the pre-deployment processes are executed.
Eg. running test case. On success or failure, Jenkins is setup to send mails to developers.
4. Create image for each tenant once pre-deployment is successful, and deployed to their respective docker hub account. After successful uploading of new image, respective tenants receive mail about new updates.
On client server:
- Client server needs to have Docker installed.
- Client can take pull of the latest image from their respective Docker-hub account.
- If container spins properly, application will run with the new changes, else application is rolled back to the previous running container with old image.
Summary:
Initial time spend during development has reduced our efforts in the development cycle’s later stages. Also the deployment process with Docker was a great experience and very suitable in a multi-tenant application with a single repository.


